Manual Attribution: Recording Conversions and Events by Email
Some sales never reach ClickerVolt on their own. An affiliate network that doesn't fire a postback, an OLSP megalink (where the sale isn't posted back), an offline or phone order — the click was tracked, but nothing told ClickerVolt the visitor converted.
Manual Attribution closes that gap: you give it the buyer's email, and ClickerVolt finds that visitor, matches them back to the click that brought them in, and records the conversion or event exactly as if it had fired automatically — feeding your stats, funnels, and ad-platform sync.
It handles one email or a whole batch in a single run, and it has a built-in shortcut for pasting an OLSP transactions table directly.
Before you start
- The visitor must already exist in ClickerVolt. Manual Attribution does not create visitors — it finds an existing one by email. ClickerVolt must have seen that email before: the person clicked one of your tracking links and ClickerVolt captured their email (via an opt-in/checkout form, an email in the link URL, or
cvIdentify). See Cross-Device Tracking and Identity Resolution for how emails get attached to visitors. - That visitor needs an attributable click. There has to be a real click in their history for the conversion to attach to. A known email with no click cannot be attributed.
- You need the buyer email addresses — from your network dashboard, OLSP, your CRM, or order export.
How to record an attribution
- Open the Visitors page from the main navigation menu then click the Manual Attribution button at the top-right of the page.
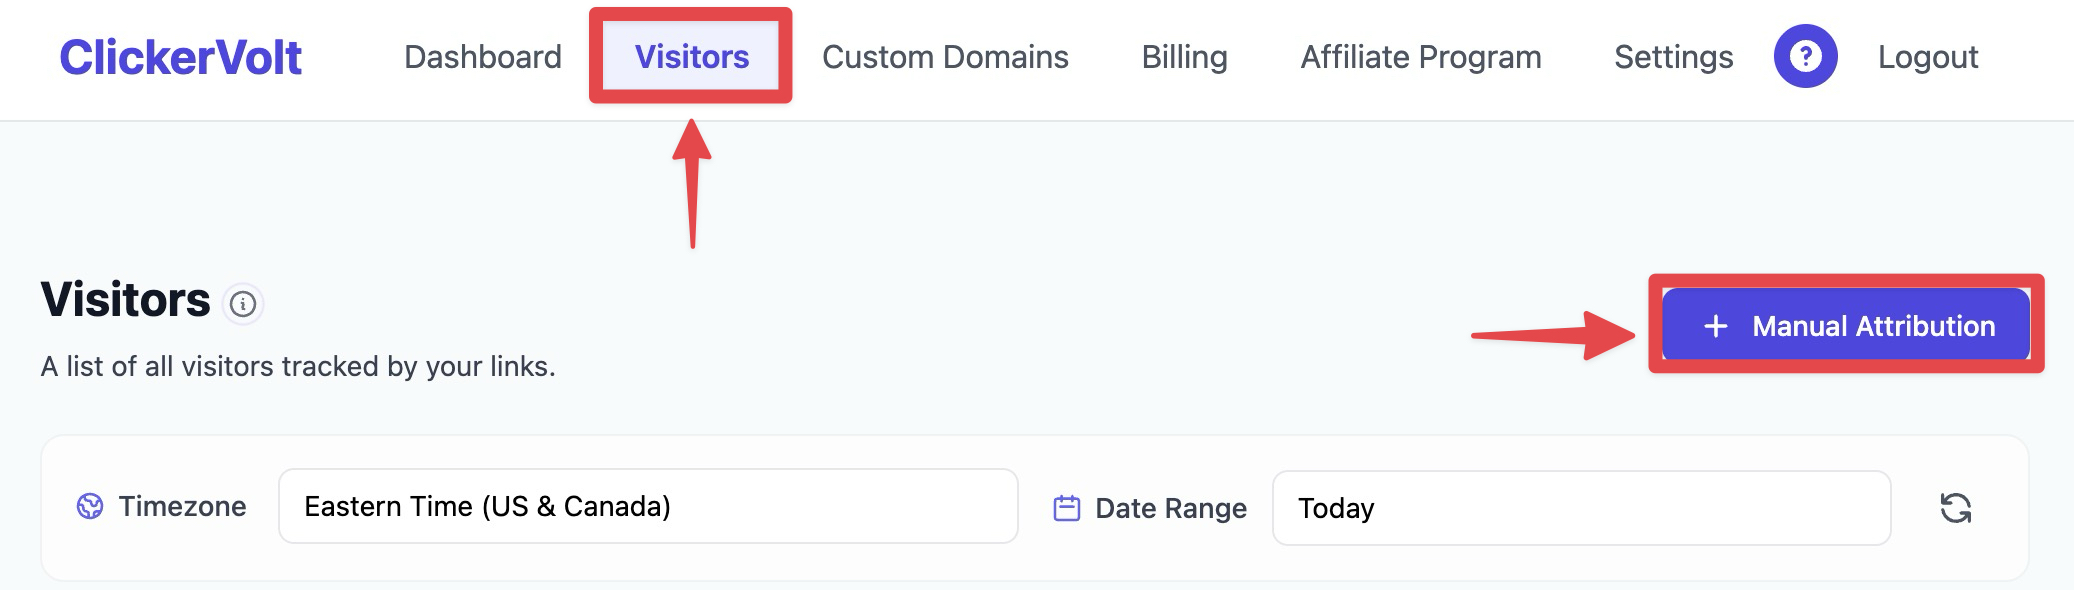
- The Manual Attribution panel slides in from the right.
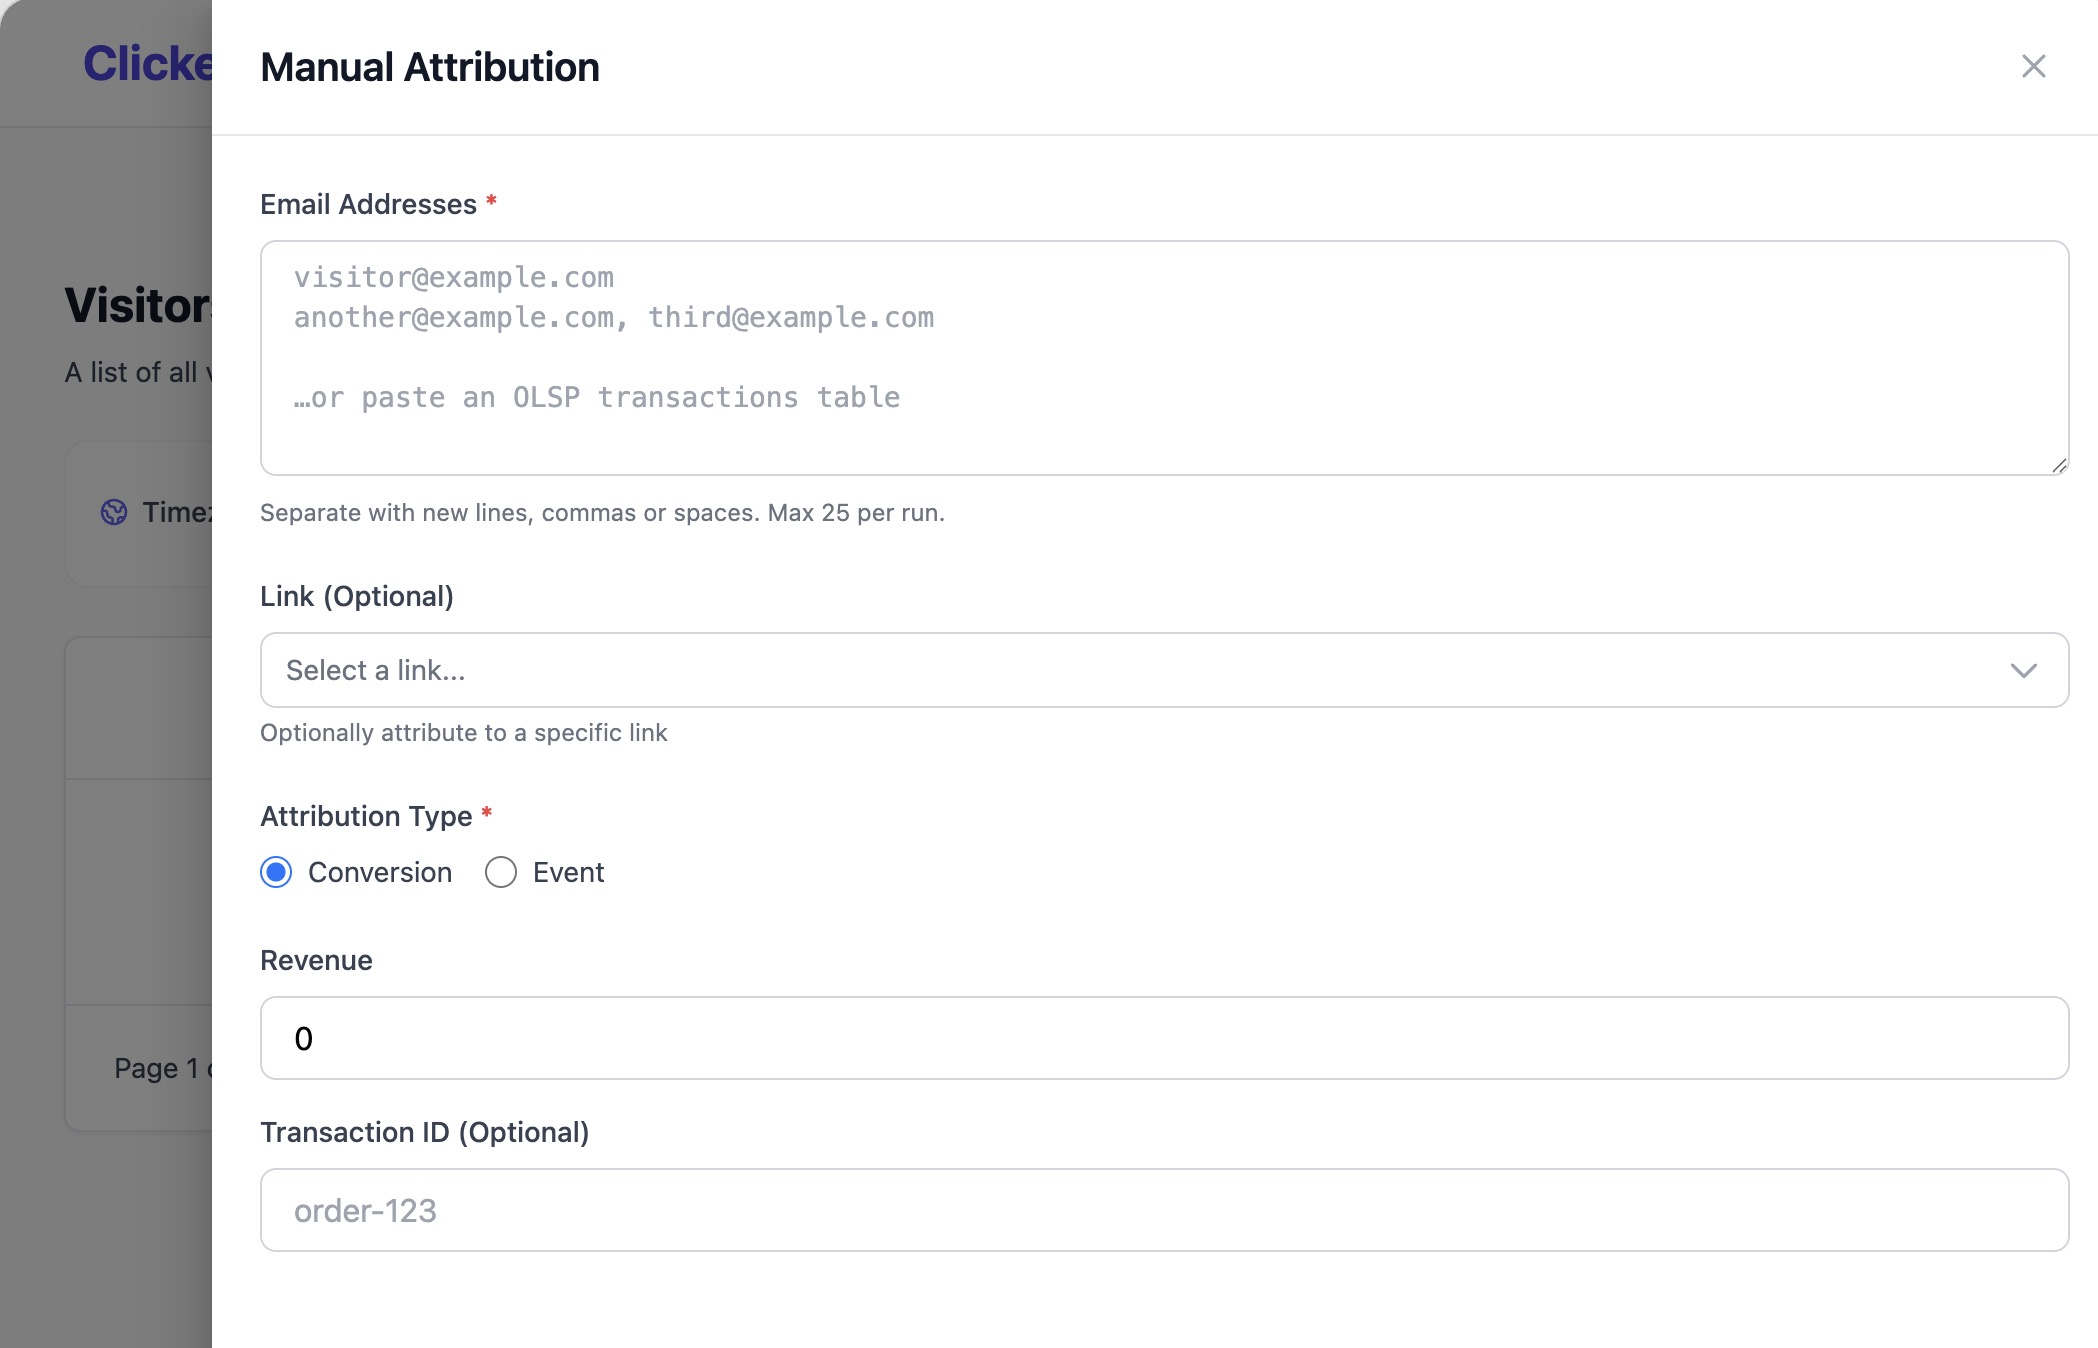
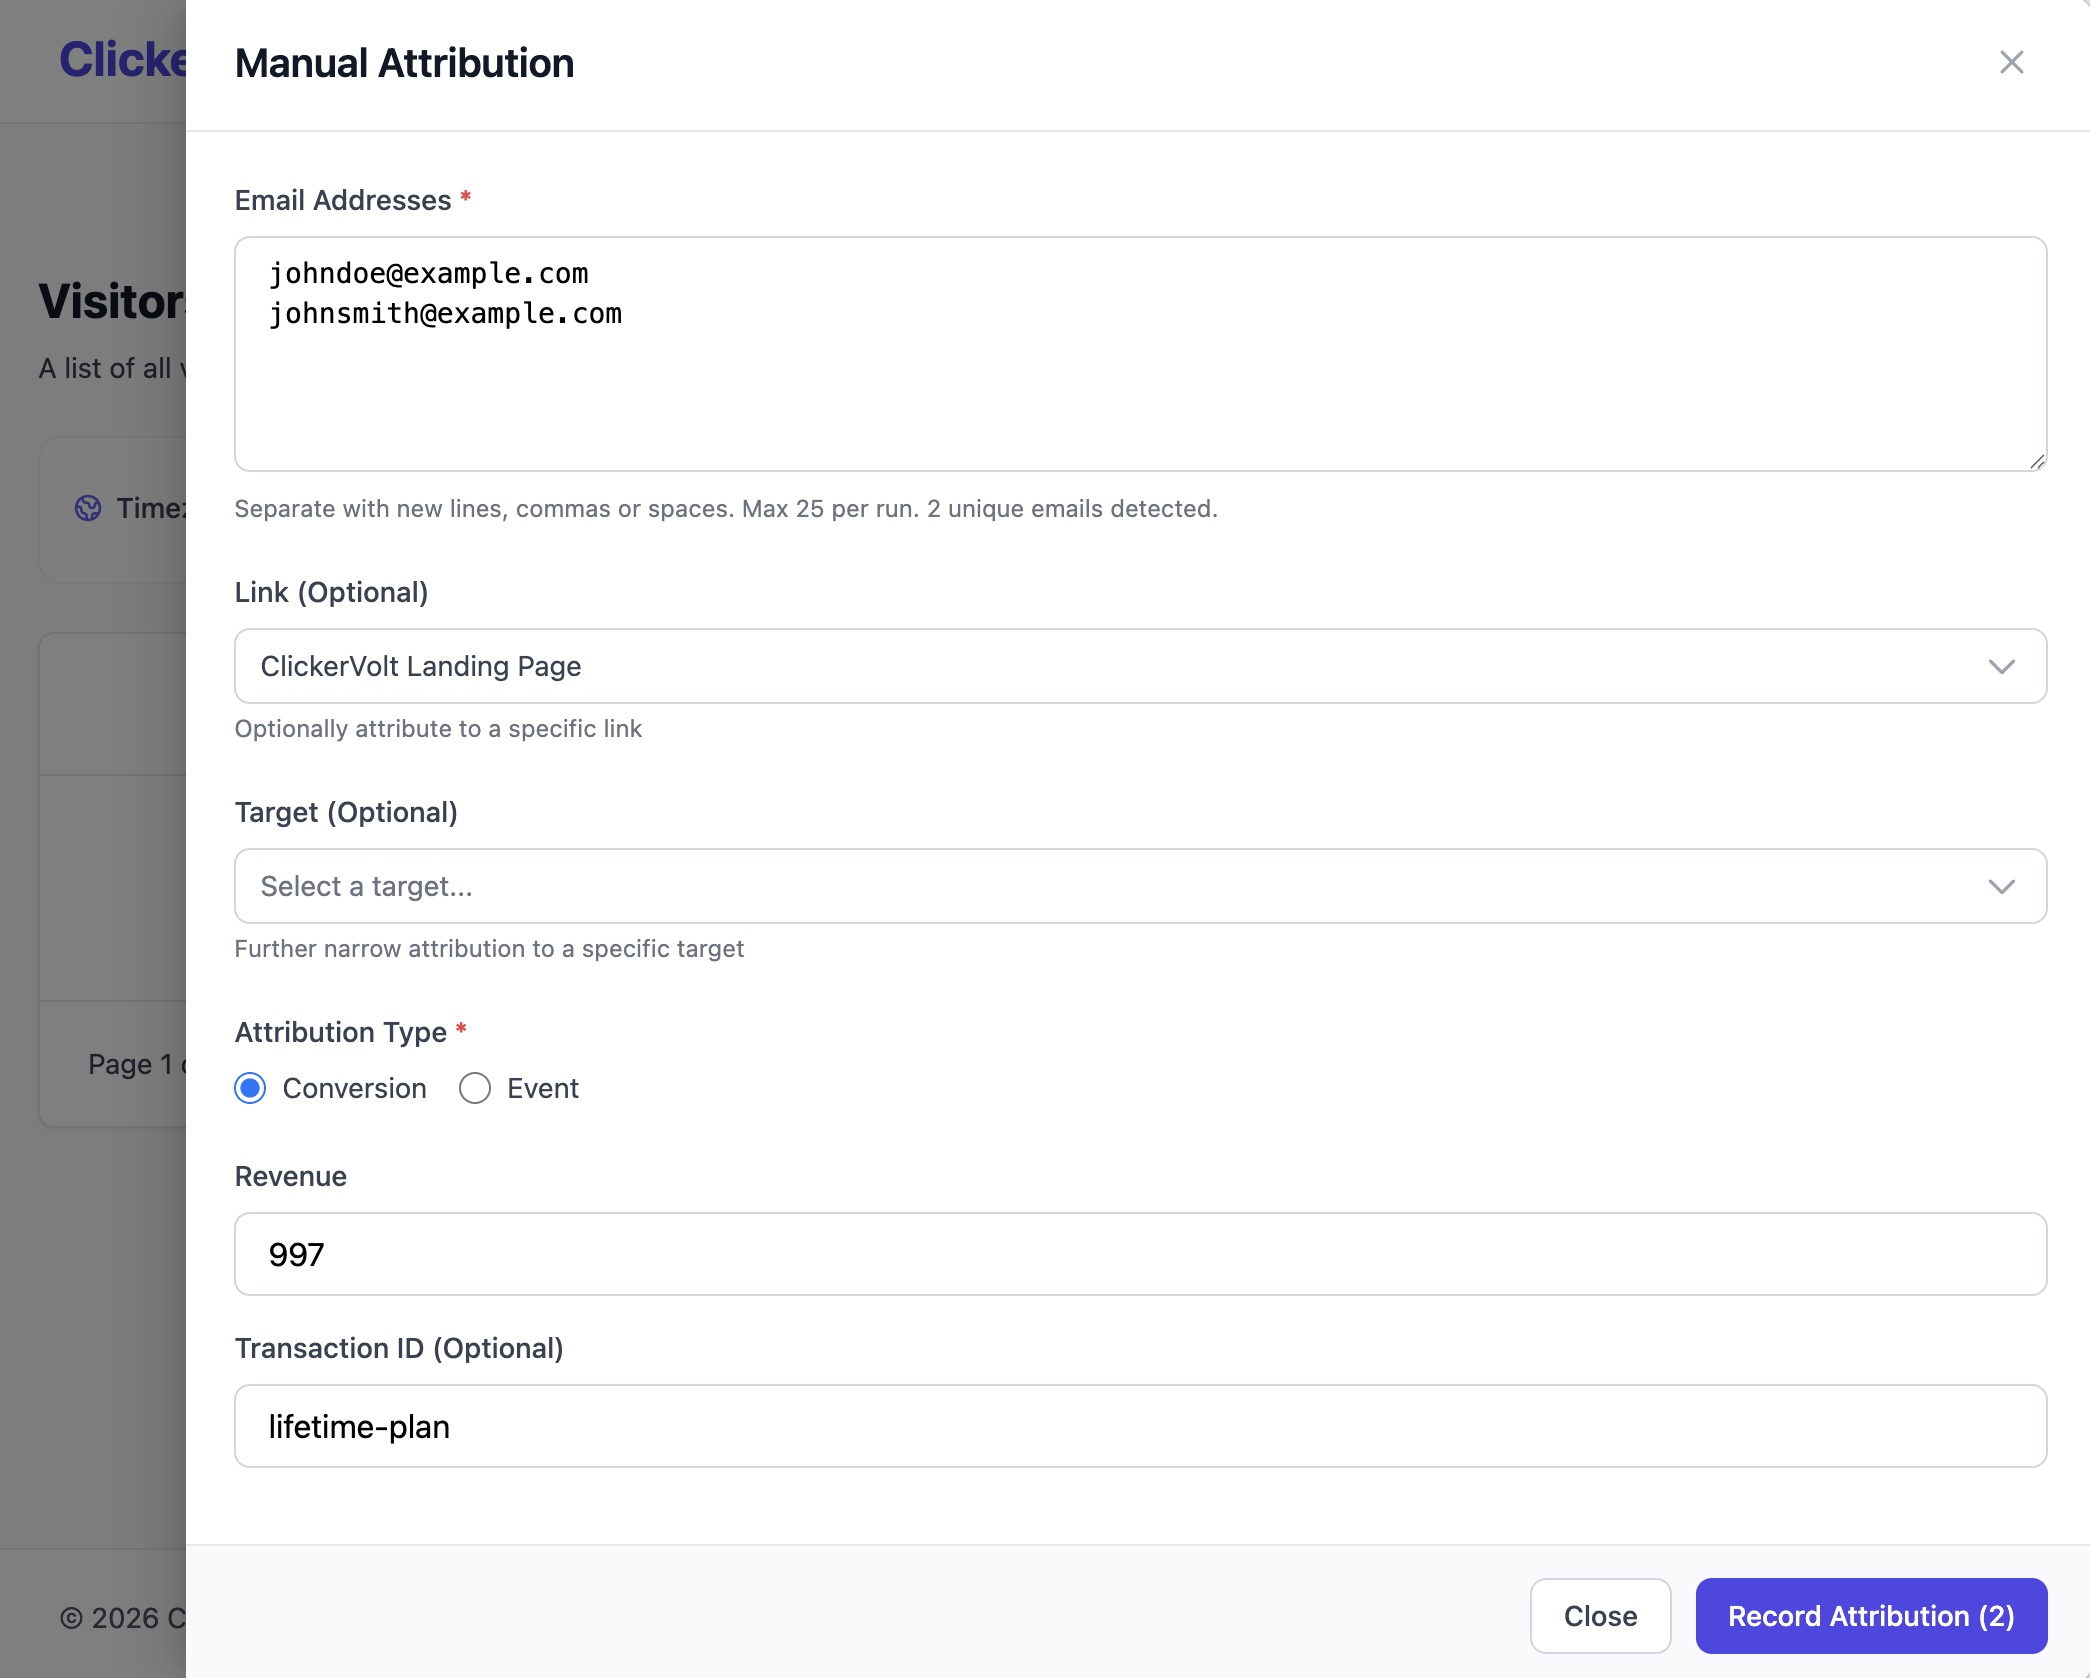
- In Email Addresses, enter one or more buyer emails. Separate them with new lines, commas, or spaces. As you type, the panel shows how many unique emails it detected.
- Choose the Attribution Type:
- Conversion — a sale or main conversion. Optionally fill in Revenue and a Transaction ID (e.g.
order-123). Revenue and Transaction ID apply to every email in this run. - Event — a custom event. Pick the Event Number (Event 1 through Event 10) that matches the action you're recording.
- Click Record Attribution. For a batch the button reads Record Attribution (N) where N is the number of emails.
ClickerVolt resolves each email, attributes the conversion or event to that visitor's matching click, and refreshes the visitor list when anything was recorded.
Pasting an OLSP transactions table
Because OLSP does not post the sale back to ClickerVolt, the panel has a dedicated shortcut for reconciling OLSP sales in bulk.
Copy the transactions table out of OLSP and paste it straight into the Email Addresses box.
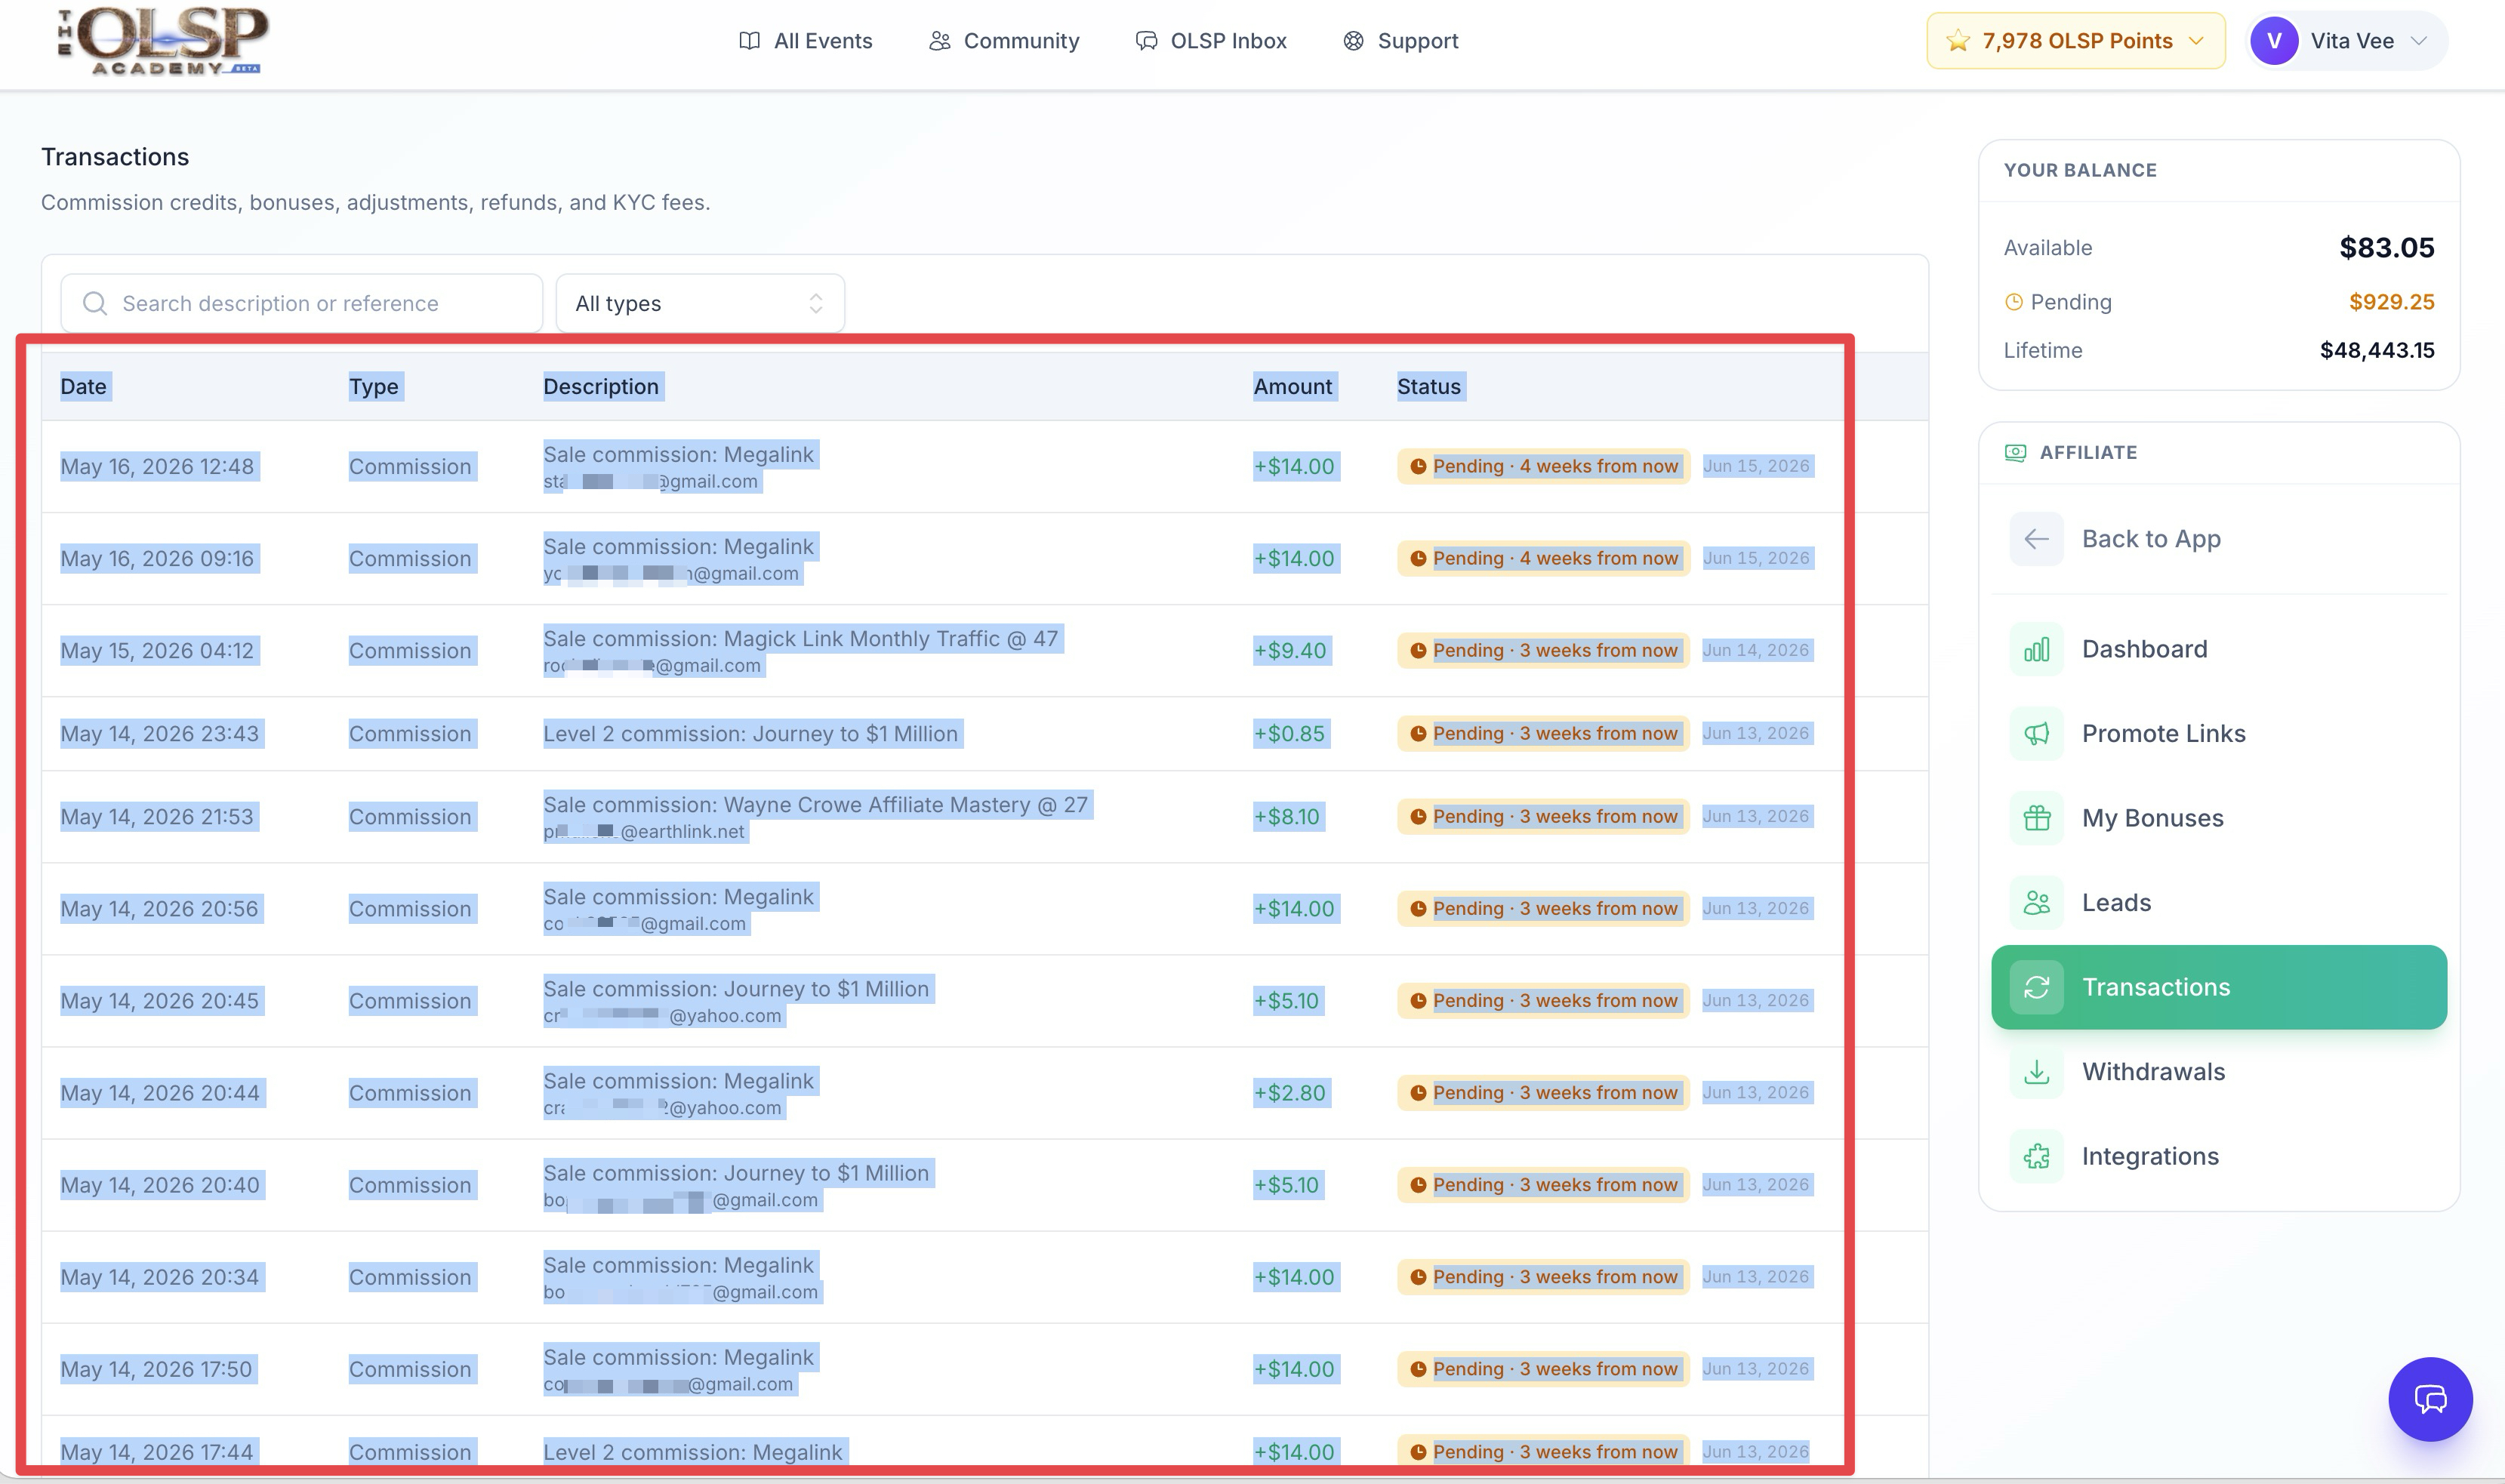
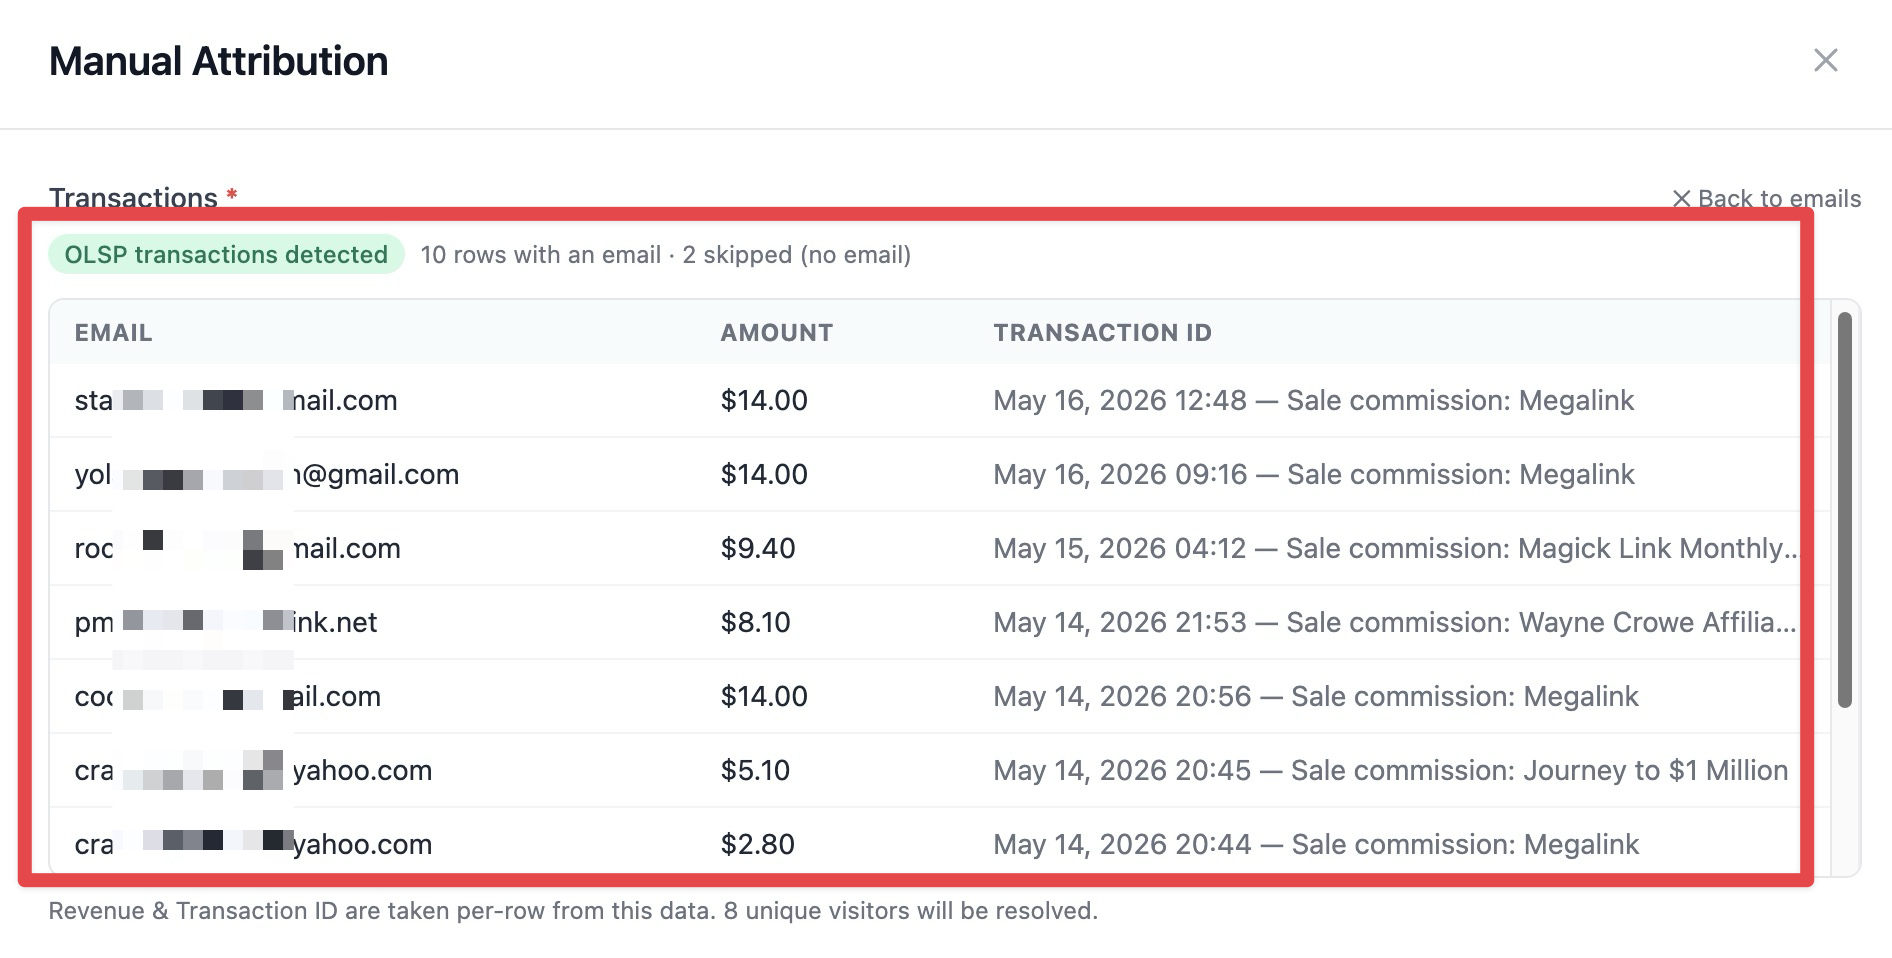
ClickerVolt detects the OLSP format automatically and switches into a read-only Transactions view, showing an "OLSP transactions detected" badge and a table with Email, Amount, and Transaction ID for each row. Rows without an email are skipped and counted ("X skipped (no email)").
In this mode:
- Attribution Type is locked to Conversion — OLSP rows are sales.
- Revenue and Transaction ID are taken per row from the pasted data, not from the form. You don't fill them in manually.
- The button reads Record N Conversions.
- To go back to typing emails by hand, click ✕ Back to emails.
For the full OLSP setup (opt-in and checkout-view auto-tracking), see Tracking OLSP Megalinks.
Narrowing to a specific Link or Target
By default ClickerVolt attributes to the visitor's most relevant recent click across all your links. To force the conversion onto a specific campaign, use the optional selectors:
- Link (Optional) — restrict attribution to a click on that link.
- Target (Optional) — appears once you've picked a Link that has targets; narrows further to a single target.
When you select a Link or Target, the match is strict: ClickerVolt will only attribute to a click on exactly that Link/Target and will not fall back to any other click. If the visitor has no click there, that email comes back as not attributed (see below) so nothing lands on the wrong campaign.
Leave both empty unless you specifically need to pin the conversion to one campaign.
Reading the results
After a run, the panel summarises the outcome:
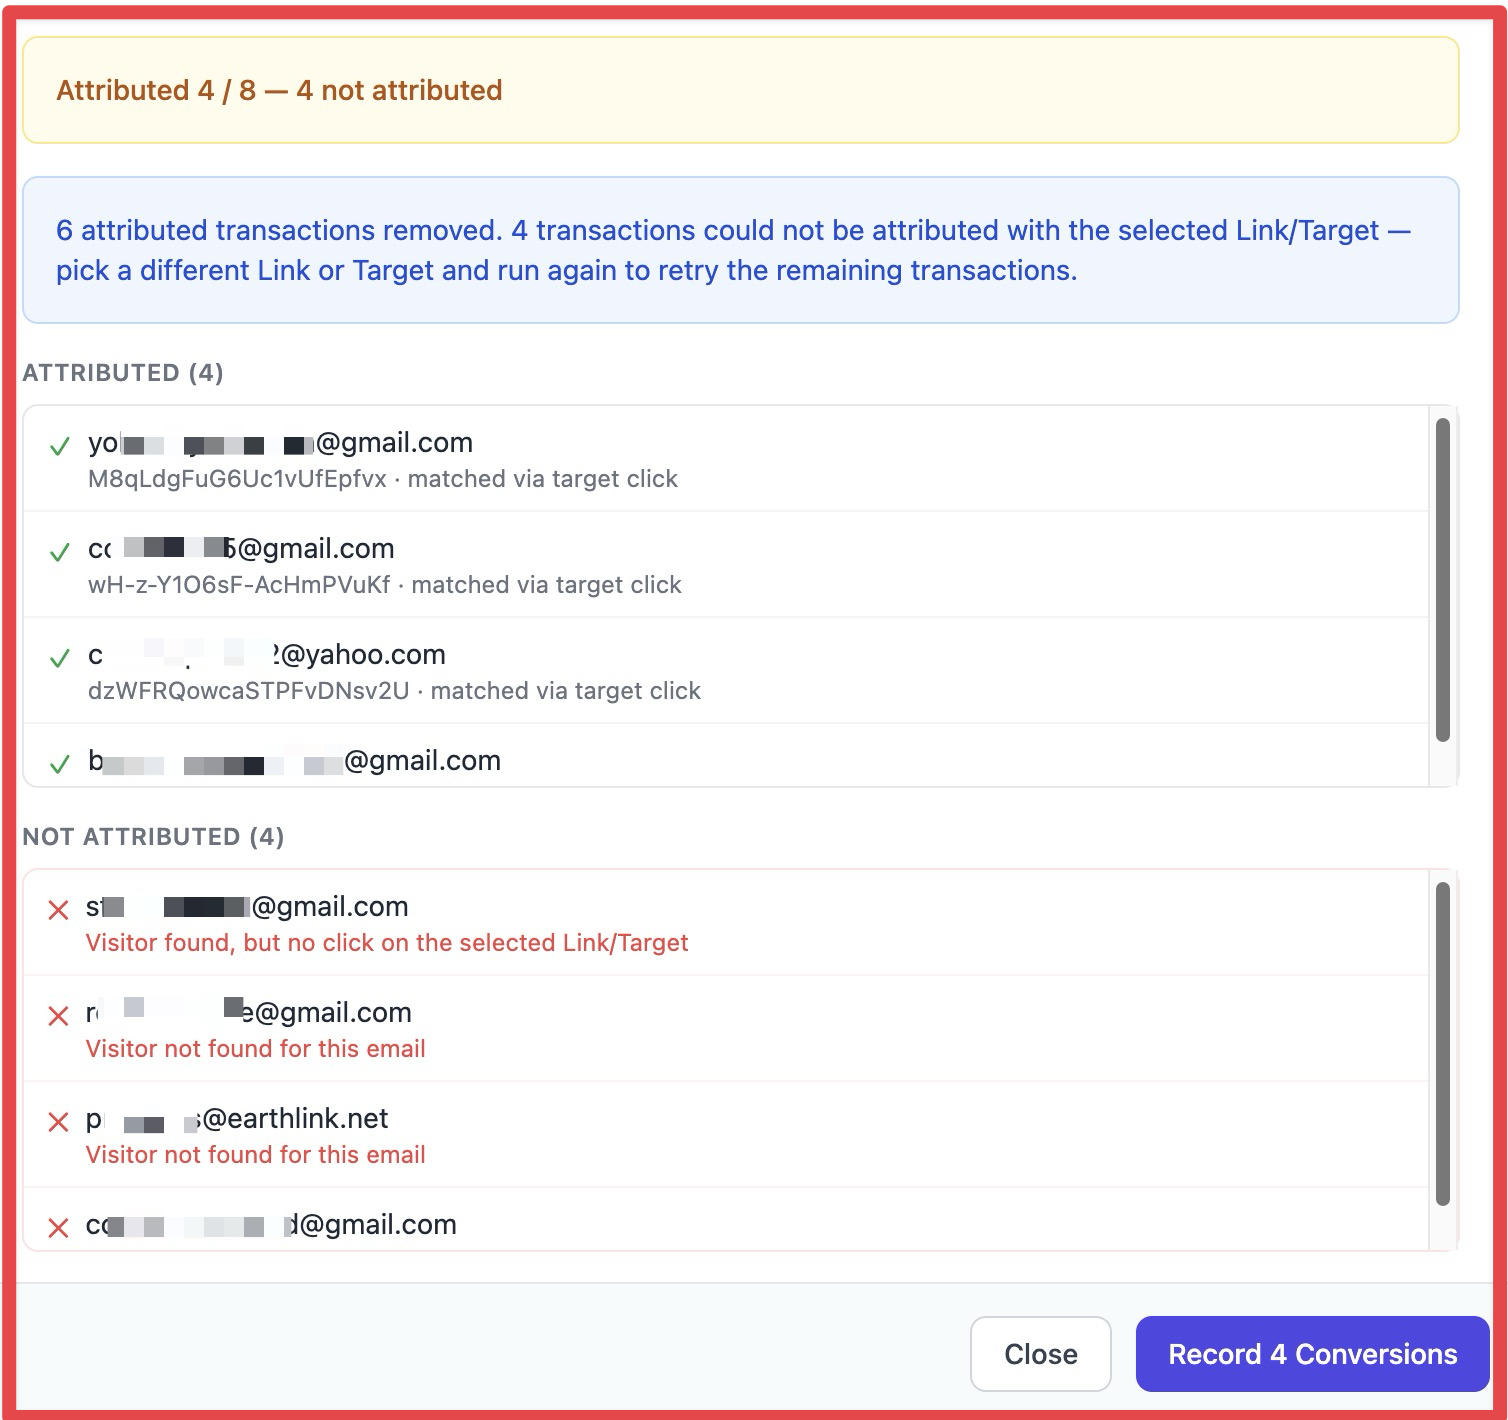
- Attributed X / total — green when everything attributed, amber when some didn't.
- Attributed (N) lists each successful email with its visitor ID and how it matched — target click, link click, or last click.
- Not attributed (N) lists each email that couldn't be recorded, with the reason:
- Visitor not found for this email — ClickerVolt has never seen this email. The person hasn't clicked a tracked link, or their email was never captured.
- Visitor found, but no attributable click history exists — the visitor exists but has no click to attach the conversion to.
- Visitor found, but no click on the selected Link/Target — you pinned a Link/Target and this visitor has no click there.
- Invalid email format — the entry isn't a valid email address.
Retrying what didn't attribute
Manual Attribution is built to run again safely:
- Successfully attributed emails are removed from the box automatically — re-running won't double-record them.
- Emails that failed stay in the box (or the OLSP table) so you can fix a typo and run again, or change the Link/Target and retry.
- Your Link, Target, and Attribution Type stay selected between runs so you can process several batches with the same settings.
- If you had a Link or Target selected and some failed, a blue notice explains exactly what was removed and what to retry — typically: pick a different Link or Target and run again.
Closing the panel clears everything; the next time you open it you start fresh.
Limits and good to know
- Maximum 25 emails per run. The panel warns you before you submit if a batch is too big — split it and run it in parts.
- Recording is per unique email + Transaction ID combination. The same email cannot convert multiple times with the same Transaction ID. This is to prevent recording duplicate conversions.
- A manual conversion behaves like any automatically tracked one — it flows into your link stats, funnels, cohort/LTV, and any configured ad-platform sync and webhooks. There is no separate "manual" treatment downstream.
What's next
- Tracking OLSP Megalinks — the full OLSP funnel setup; manual attribution is how you reconcile the sale.
- Viewing Your Visitor List and Understanding Visitor Profiles — confirm the conversion landed on the right visitor.
- Cross-Device Tracking and Identity Resolution — how emails get attached to visitors in the first place, which is what makes a visitor findable here.